

Why Your Cloud Renders Look Different From Your Local Preview
SUMMARY
EXECUTIVE ANSWER // WHY CLOUD RENDERS DIFFER
Cloud renders look different from your local preview when the render machine does not have exactly what your computer has. The most common cause is missing assets: textures, proxies, IES files, or HDRIs linked with absolute paths that do not exist on the remote machine, which shows up as grey surfaces or vanished objects. Next come version mismatches in the render engine or scatter plugins, colour corrections applied in the frame buffer that are not saved to the output file, a switch between GPU and CPU rendering, and different render settings between the interactive preview and the final pass.
It is Monday morning. You open a batch of 12 newly delivered exterior renders, expecting the hero shots you spent all week perfecting. Instead, the main brick facade has collapsed into flat grey concrete, and your entire tree line has vanished even though your local viewport looked flawless. Before blaming the cloud node for corrupting your scene, remember this simple rule: remote render machines only render what you give them. A single missing file path or mismatched plugin build can completely break an output. This guide breaks down the six visual signatures of cloud render errors and provides a quick pre-flight checklist to protect your deadlines.
Cloud Render Visual Diagnostics
Use this symptom map to identify the root cause of your rendering discrepancy:
Why are some surfaces grey or objects missing in my cloud render?
Source: autodesk
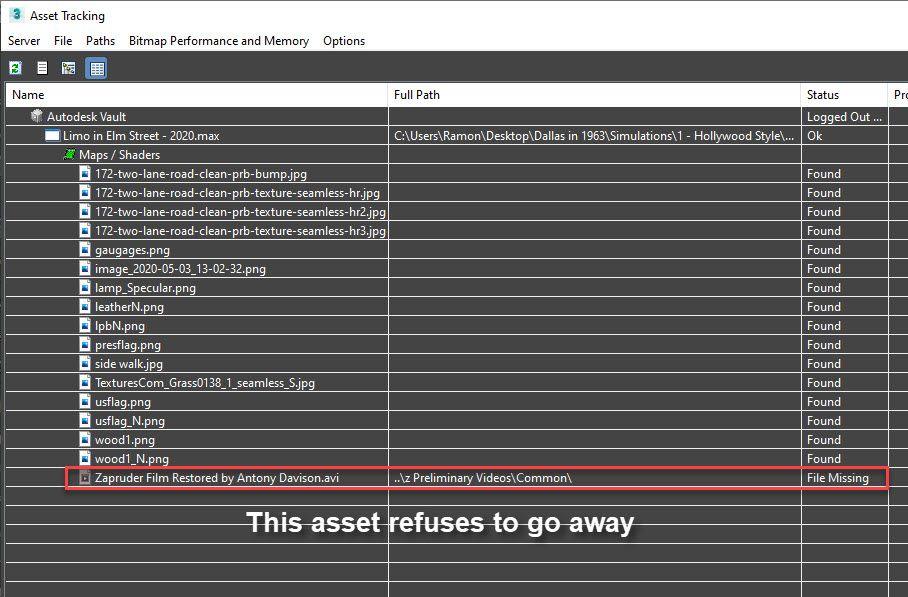
When a surface renders as solid grey or an object vanishes, the remote system is almost always failing to locate an essential asset file. Render engines rely on file paths to pull textures, proxy meshes, photometric IES files, and HDRI environment maps into memory during the compilation phase.
If your scene links assets using absolute local paths (such as D:\Projects\ClientA\Textures\Brick_Diffuse.jpg), the render machine will look for that exact file structure. Because that directory path does not exist on the remote server, the engine skips the asset, rendering default untextured geometry or dropping proxy references completely.
To prevent broken links, always bundle your assets using relative paths before sending a scene to the cloud:
- V-Ray for SketchUp & Rhino: Use the built-in Pack Project utility to archive your scene and asset tree into a self-contained ZIP archive.
- Autodesk 3ds Max: Use the Archive command or Resource Collector, and verify asset links via the Asset Tracking toggle (Shift + T) to convert absolute paths into relative paths.
- Log Verification: Always inspect your engine’s render log window after initiating a render. Look for explicit WARNING: File not found or Missing Asset lines to pinpoint broken paths before letting a full batch execute.
Early in my career, I delivered a batch of exterior commercial renders where the asphalt road rendered as a giant, smooth grey ribbon. The asphalt texture sat tucked inside my local Downloads folder, meaning the asset never made it into the main project directory.
Can a different software or plugin version change the image?
Yes. Even if all texture files are bundled correctly, minor build differences in host applications, render engines, or procedural plugins can noticeably shift light behavior, procedural shaders, and object placement.
Scatter plugins like iToo Software’s Forest Pack or RailClone rely on precise algorithmic seed calculations. If your local scene was designed using one build and the cloud system processes the scene using an older or newer build, scattered trees, grass patches, or entourage assets can shift positions, scale incorrectly, or fail to generate altogether. Before initiating cloud rendering, document your software builds down to the build number. If you use a managed scene-upload service, verify that their supported software grid matches your exact builds. If you rent dedicated cloud hardware, install the identical software version and plugin builds you run on your local workstation.
Why are the colours or brightness different from what I saw in the frame buffer?
This usually happens because color tweaks made inside the Frame Buffer (VFB) are not always saved directly into your output image file.
Tools like the V-Ray Frame Buffer or Corona Image Editor let you tweak exposure, contrast, and LUTs on the fly. However, whether these edits stay in your saved file depends on the file format:
- 32-bit Formats (EXR / HDR): These files only save raw light data and ignore your VFB color tweaks. When opened in standard image viewers, they often look dark or flat until you adjust color settings in post-production.
- 8-bit Formats (JPG / PNG): Saving directly as a JPG or PNG usually bakes your VFB color corrections into the final image, as long as your render output settings allow it.
Render one frame on the cloud, save it, and view it right next to your local VFB preview on the same monitor. Remember that two monitors with different color settings can also make the exact same image look completely different.
Does GPU versus CPU rendering change the result?
When you test-render inside your 3D viewport, the software’s primary goal is speed, not pixel-perfect accuracy. It wants to give you instant feedback so you can tweak lighting and materials on the fly.
To achieve this fast preview, interactive viewports typically run in Progressive mode alongside aggressive, AI-powered denoisers like NVIDIA OptiX. These AI denoisers act like a “smart blur”—they smooth out heavy noise in just a few seconds, but they often smudge fine surface textures, soften crisp edge highlights, and fake the final look to save time.
Final cloud rendering, on the other hand, is built for maximum precision. Cloud passes generally switch to Bucket mode, running significantly lower noise thresholds, higher anti-aliasing samples, and production-grade algorithms like V-Ray Denoise or Intel Open Image Denoise. Instead of guessing details like AI preview denoisers do, production renderers calculate true physical light rays, which reveals micro-details and texture bump maps that were previously smoothed out during your interactive preview.
The Resolution Effect:
There is also a simple visual illusion at play. A small viewport window on your monitor naturally hides subtle grain because the pixels are compressed into a compact area. Once that exact same scene is rendered out at a crisp 4K or 8K resolution, individual noise patterns and sharpening filters become instantly visible on larger displays.
To avoid unwanted grain or harsh artificial edges, always run a single-frame test render using your final production settings at native resolution before launching the whole sequence.
How do I check everything before sending a full batch?
The most effective way to avoid wasted rendering budgets and deadline stress is to enforce a mandatory pre-flight checklist.
Rendering a single test frame on the remote system costs a fraction of a full sequence and provides absolute proof that textures, lighting, plugins, and color pipelines match your local expectations.
Does the type of cloud service change how often this happens?
The frequency of rendering discrepancies depends heavily on how environment matching is managed across different cloud service models. Neither model is immune to visual errors; the difference lies in who manages the software environment.
For managed scene-upload farms (SaaS), the provider configures the remote environment. You upload your scene file through an automated plugin, and the farm’s backend parses the assets. Discrepancies occur if the farm runs a slightly different plugin update or engine build than your local desktop.
For rented dedicated workstations (IaaS), providers like iRender give you bare-metal remote access to hardware equipped with high-performance GPUs like the RTX 4090 or RTX 5090 (such as their single-card 3i package). Because you log in directly and install your own host software, render engines, custom scripts, and plugin builds, you create an exact mirror of your desktop environment.
Take Full Control of Your Render Pipeline with iRender
Eliminate environment mismatches by renting high-performance, dedicated cloud workstations tuned exactly to your specifications. With root administrative access, you can mirror your desktop setup down to the exact software build, engine update, custom scripts, and plugin versions ensuring your cloud outputs match your local previews every single time.
Supercharge your arch-viz workflow with next-generation NVIDIA RTX 5090 nodes (featuring 32GB GDDR7 VRAM). Designed for effortless handling of massive V-Ray GPU scenes, heavy Corona builds, and complex USD/Solaris stages without running into VRAM bottlenecks, iRender gives you the raw multi-GPU power needed to meet aggressive deadlines.
→Try an RTX 5090 Node & Claim Your 100% First-Deposit Bonus
Frequently Asked Questions
- Why does my render farm output have grey or missing textures?
Grey or plain white surfaces occur when asset files are linked using absolute local directory paths (like D:\Textures) that do not exist on the remote render system. To fix this, use your software’s packaging utility (such as V-Ray’s Pack Project or 3ds Max Archive) to bundle all assets using relative paths, and check the render log for missing file warnings.
2. Why did trees and scattered objects disappear in my cloud render?
Missing scattered geometry usually indicates that the render node lacks the specific scatter plugin (such as Forest Pack or RailClone) or proxy mesh files used in your scene. Always log your exact plugin versions, include proxy assets in your project archive, and ensure the remote environment matches your local setup.
3. Why are my cloud render colours different from the V-Ray frame buffer?
Color and exposure differences occur when post-processing layers (such as LUTs, curve adjustments, or exposure tweaks) applied in the frame buffer are not saved into the output image file. Render a test frame, compare it side-by-side with your local preview, and verify whether your color corrections are set to save to disk.
4. Can V-Ray GPU and V-Ray CPU give different results?
Yes. V-Ray GPU and V-Ray CPU use different ray-tracing architecture. Certain procedural maps, advanced shaders, or volumetric lighting effects may compute differently between the two engines. Always preview your scene using the exact engine architecture you plan to use for final rendering.
5. How can I make sure a cloud render matches my preview?
Bundle your project with relative paths, verify asset links, match software and plugin build numbers, align render settings, and always run a single test frame on the target cloud system. Inspecting a single test frame side-by-side with your local preview eliminates surprises before running a full production batch.
See more: Why Enscape Looks Different on Every Machine (Hardware Consistency Problem)