Best Render Settings for Blender Cycles
In the world of 3D design, creating a visually stunning scene or model is only part of the creative journey. The real challenge lies in how long it takes to see the final result. Rendering is always the most challenging phase, where we have to trade off between image quality and waiting time. With the 2026 updates to Blender Cycles, that gap is closing faster than ever thanks to AI-driven features and advanced hardware optimization. This blog will walk you through the Best render settings for Blender Cycles to achieve cinematic results while keeping your render times fast and your workflow efficient.
Let’s discuss it with Radarrender!
I. Understanding of Blender Cycles rendering
1. What is Blender Cycles?
Blender Cycles is Blender’s primary rendering engine for creating realistic images. It is designed to simulate how light behaves in the real world, which helps artists produce more natural and lifelike renders.
Cycles uses a rendering technique called path tracing. This means the engine calculates how light travels in a scene. Light rays bounce between objects, reflect on surfaces, pass through glass, and spread across the environment. Because of this process, Cycles can create very realistic lighting and shadows.

source: cycles-renderer
2. Key features of Blender Cycles
Physically Accurate Lighting
Cycles calculates lighting in a way that is similar to how light works in the real world. This helps make scenes look more natural and believable.
Global Illumination
Global illumination means that light can bounce from one surface to another. For example, light from a bright wall can reflect onto nearby objects and slightly light them up. This adds more depth and realism to the scene.
Realistic Reflections and Shadows
Cycles can create detailed reflections and soft shadows. Materials like metal, glass, and water react to light in a realistic way. Shadows also look smoother and more natural depending on the light source. Because of these features, Blender Cycles is a powerful tool for artists who want to create realistic and professional-looking 3D renders.
II. Best render settings for Blender Cycles
1. GPU setting for rendering
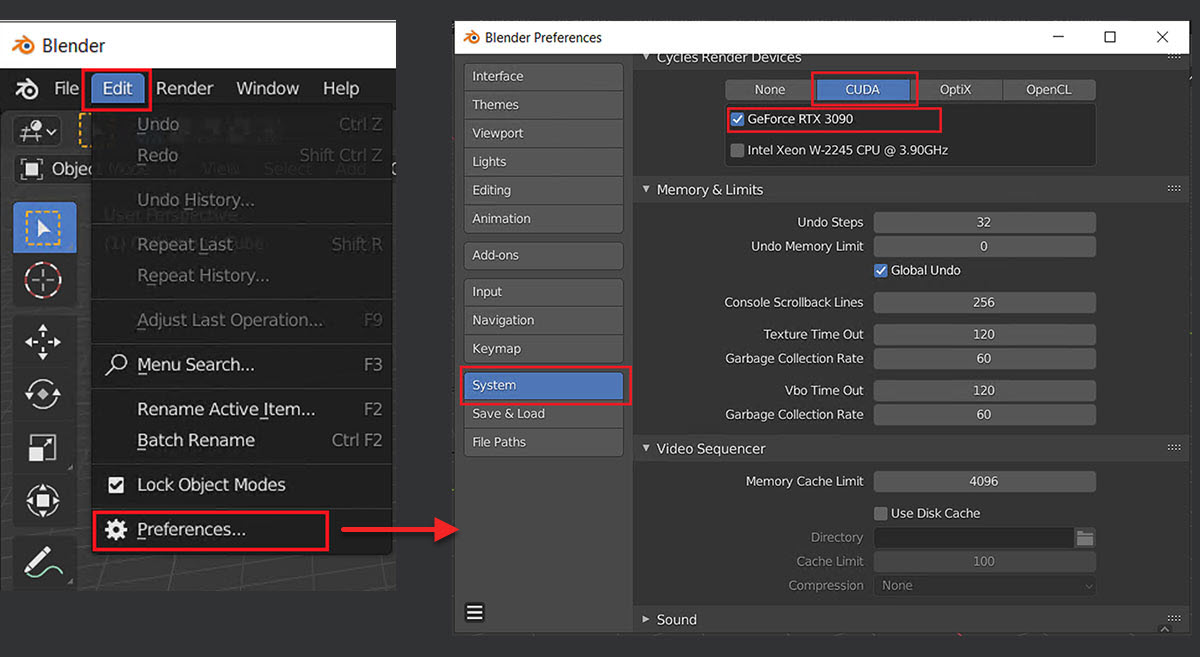
When rendering in Blender Cycles, one of the most important settings to check is the Device option. This setting determines whether your scene will be rendered using the CPU (your computer’s processor) or the GPU (your graphics card). In most cases, using the GPU is much faster than using the CPU. Graphics cards are designed to handle large numbers of calculations at the same time, which makes them very efficient for rendering tasks.
To use GPU rendering, first make sure your graphics card supports it. After that, you need to enable the GPU in Blender’s preferences. Go to Edit → Preferences → System, then select your GPU under the Cycles Render Devices section. Once it is enabled, you can go to the Render Properties panel and change the Device option from CPU to GPU.
2.Sampling
In Blender Cycles, Samples are one of the most important settings that affect both render quality and render time. Samples determine how many times the renderer calculates lighting for each pixel in an image. In simple terms, the more samples you use, the more information Cycles gathers about the lighting in the scene.
Higher sample values usually produce cleaner and smoother images, because the renderer has more data to calculate accurate lighting, reflections, and shadows. However, increasing the number of samples also makes the rendering process slower.
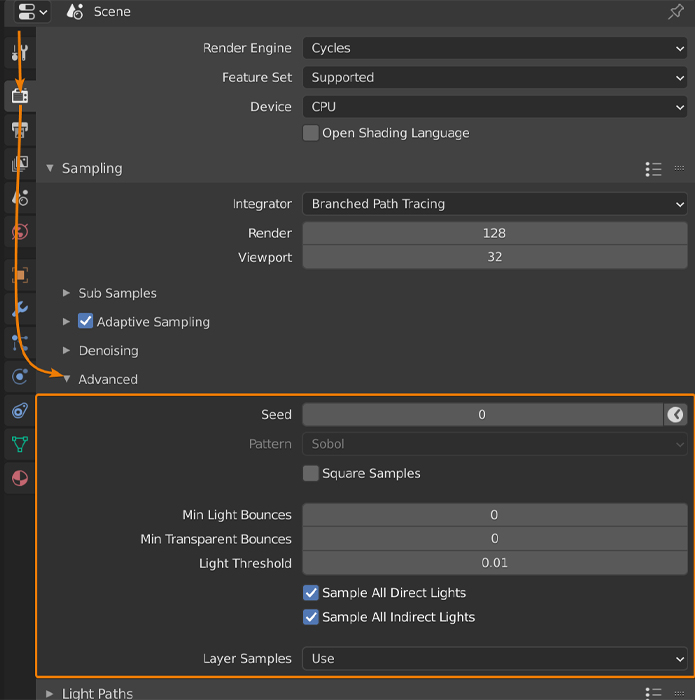
Because of this balance between quality and speed, it is important to choose the right sample values depending on your project.
Recommended Sample Settings
Here are some common sample settings used by many artists when rendering in Blender:
| Render Type | Recommended samples |
| Preview Rendering | 32-64 |
| Animation Rendering | 128-256 |
| High quality Final Render | 256-1024 |
3. Denoising
Noise is one of the most common problems when rendering in Blender Cycles. It usually appears as small grainy dots across the image, especially in darker areas or scenes with complex lighting. Using denoising allows artists to render with fewer samples while still producing clean images.
In Blender, two of the most commonly used denoisers are OpenImageDenoise and OptiX.
Recommended settings for NVIDIA GPU users:
- Denoiser: OptiX
- Enable Viewport Denoising for faster previews
- Samples: 128–256
- Adaptive Sampling: Enabled
- Noise Threshold: 0.01 – 0.03
This setup is often enough to produce clean images while keeping render times relatively low.
OpenImageDenoise is developed by Intel and works well with CPU rendering. It is widely used because it produces very clean and natural results, especially for high-quality still images.
Recommended settings for CPU users:
- Denoiser: OpenImageDenoise
- Samples: 256–512
- Adaptive Sampling: Enabled
- Noise Threshold: 0.01 – 0.02
OpenImageDenoise is slightly slower than OptiX but often preserves more fine details in textures and materials.
4. Light paths
In Blender Cycles, Light Bounces control how many times light is allowed to reflect or pass through objects in a scene. This setting plays an important role in determining how realistic the lighting looks, but it also has a strong impact on rendering time.
However, allowing too many light bounces means the renderer must calculate more light paths, which can significantly slow down rendering. Because of this, it is important to find a balance between visual quality and performance.
Recommended Light Bounce Settings
For most scenes in Blender, the following values provide a good balance between realism and rendering speed:
| Setting | Recommended value |
| Total bounce | 4-8 |
| Diffuse | 2 |
| Glossy | 2 |
| Transmission | 4 |
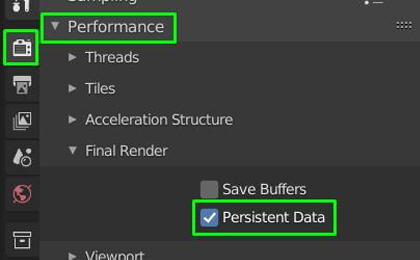
5. Performance Tab: Use Persistent Data
In Blender, the Performance tab in the render settings includes several options that help optimize rendering. One useful feature when working with animations or repeated renders is Persistent Data in Blender Cycles. This feature is particularly helpful when you are rendering animations or when you repeatedly adjust lighting, materials, or camera settings and need to render the scene multiple times. Since the scene data is already stored in memory, Blender skips the preparation stage and begins rendering more quickly.
How to Enable Persistent Data
To enable this feature:
- Open the Render Properties panel.
- Scroll down to the Performance section.
- Enable the Persistent Data checkbox.
III. Conclusion
To sum up, getting the best results in Blender Cycles isn’t about making everything ‘heavy’ or ‘high.’ It’s about being smart with your settings. By carefully adjusting key settings such as samples, light bounces, denoising, device selection, and performance options, artists can significantly improve their workflow and reduce unnecessary render times.
Ultimately, the best settings may vary depending on the type of project, hardware capabilities, and desired visual quality. Experimenting with different configurations and understanding how each setting affects performance will help you find the most efficient workflow. With the right optimizations, artists can create beautiful, professional-quality renders while keeping render times under control.
See more: Blender System Requirements in 2025: What You Need to Know